
How to Regrow Vegetables from Scraps
Celery
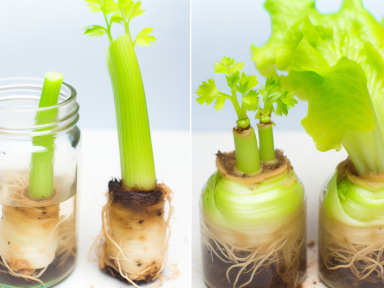
Celery is a hardy vegetable that can be easily regrown from its base. Here’s a step-by-step guide:
- Cut the base: When using celery, leave about 2-3 inches of the base intact.
- Prepare water: Place the base in a shallow bowl with enough water to cover the bottom. Ensure the cut side is facing upwards.
- Sunlight: Position the bowl on a sunny windowsill where it can receive ample light.
- Wait: Within a week, you’ll notice new leaves sprouting from the center and small roots forming at the base.
- Transplant: Once the roots are about an inch long, transplant the celery base into a pot filled with potting mix, covering the roots but leaving the new growth exposed.
- Ongoing care: Water the newly potted celery regularly and ensure it continues to get adequate sunlight.
Lettuce
Regrowing lettuce is a straightforward process, perfect for anyone looking to reduce waste and enjoy fresh greens:
- Save the stump: After harvesting or using lettuce leaves, retain the bottom 2 inches of the stump.
- Submerge the base: Place the stump in a shallow dish with about half an inch of water, ensuring it remains upright.
- Provide light: Keep the dish in a sunny spot, such as a windowsill, to encourage growth.
- Refresh water: Change the water every couple of days to prevent stagnation and encourage optimal growth.
- Monitor growth: You’ll observe new leaves sprouting from the center within a few days.
- Transplant: After 10-14 days, when the roots are well-established, transfer the stump to a pot with soil, ensuring the roots are buried and the new growth is above the soil line.
- Maintain: Continue to water and provide sunlight as the lettuce grows.
Green Onions
Green onions are perhaps the easiest vegetable to regrow from scraps:
- Save the roots: Retain the white base with roots after using the green tops.
- Submerge in water: Place the root ends in a glass with enough water to cover the roots, leaving the top exposed.
- Light and location: Place the glass on a sunny windowsill.
- Observe: New green shoots will begin to grow from the tops within just a few days.
- Ongoing care: Change the water every couple of days. Once the greens reach around 4-5 inches, you can cut them for use, and they will continue to regrow.
Garlic
Re-growing garlic is both simple and rewarding:
- Choose a clove: Select a large, firm clove from a bulb of garlic.
- Plant: Place the clove in a small pot with soil, root side down, ensuring the pointed end is just below the soil surface.
- Water: Keep the soil slightly moist but not waterlogged.
- Sunlight: Place the pot in a sunny area, such as a windowsill that receives at least six hours of light daily.
- Growth: In a few weeks, you’ll see green shoots emerging from the soil, which can be used much like green onions.
- Full bulbs: For those wishing to grow entire garlic bulbs, allow the new shoots to grow while ensuring the plant receives ample sunlight and nutrients.
GIPHY App Key not set. Please check settings