
The Art of Seed Saving
Saving seeds is a time-honored tradition that ensures the continuity of your favorite plant varieties year after year. This practice not only preserves the genetic diversity of plants but also saves money and fosters a deeper connection with your garden. Here, I’ll share some specific, practical techniques for old-fashioned seed saving that have stood the test of time.
1. Selecting the Right Plants
Choosing the best plants for seed saving is the first critical step. Here are a few tips to guide you:
- Opt for heirloom or open-pollinated varieties as they produce true-to-type seeds.
- Choose the healthiest and most vigorous specimens from your garden.
- Avoid hybrid plants since their seeds often don’t produce offspring identical to the parent plant.
2. Harvesting Seeds
Harvesting seeds at the right time is key to seed longevity and viability.
a. For Dry Seeds
Dry seeds, such as beans, peas, and lettuce, should be harvested when they are completely dry on the plant.
- Beans & Peas: Allow pods to dry on the plant until they rattle.
- Lettuce: Wait for the fluffy seed heads to appear; cut the stalks and place them upside down in a paper bag to continue drying.
b. For Wet Seeds
Wet seeds, such as tomatoes, cucumbers, and melons, require a different approach.
- Tomatoes: Scoop out the seeds and pulp into a jar. Add water and let ferment for 3-5 days, stirring daily. Rinse seeds in a sieve and dry them on a paper towel.
- Cucumbers & Melons: Extract seeds, wash off the surrounding gel, and spread them out on a screen or paper plate to dry.
3. Cleaning and Drying Seeds
Thoroughly cleaning and drying seeds ensures they do not mold during storage.
- Screen or Sieve: Use a fine mesh screen to separate seeds from chaff.
- Air drying: Spread seeds in a single layer on paper towels, trays, or screens in a cool, dry place. Stir occasionally to ensure even drying.
- Test for dryness: Seeds should be brittle enough to break rather than bend.
4. Storing Seeds
Proper storage is crucial for maintaining seed viability until the next planting season.
- Use airtight containers: Store seeds in glass jars or sealed envelopes inside plastic containers.
- Labeling: Don’t forget to label each container with the plant variety and date of harvest.
- Cool and dark: Keep your seeds in a cool, dark place, such as a refrigerator, to extend their shelf life.
- Silica gel packets: Adding silica gel packets can help keep humidity levels low inside your storage containers.
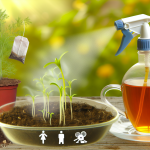
5. Testing Seed Viability
Before planting season, it’s wise to test the viability of your saved seeds.
- Germination Test: Place a sample of around 10 seeds on a damp paper towel. Roll it up and place it in a sealed plastic bag. Keep the bag in a warm, consistent environment and check daily. After a week or so, count how many seeds have germinated to gauge viability.
By following these time-tested techniques, you can ensure a successful and rewarding seed-saving endeavor. Seed saving is not only a practical skill but also a commitment to preserving the richness of our agricultural heritage.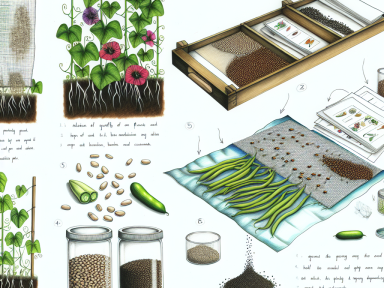
GIPHY App Key not set. Please check settings