
With increasing concerns about energy costs and environmental impact, it is important for us to explore alternative methods of cooking and heating. One such method is harnessing the power of the sun through a DIY solar oven. A solar oven can not only help reduce our dependence on traditional fuel sources but also save money in the long run. In times of emergencies or natural disasters, having a solar oven can prove to be a lifesaver, providing a reliable means of cooking food when traditional methods may not be available.
Materials needed:
- Cardboard box
- Aluminum foil
- Scissors
- Glue or tape
- Black construction paper
- Clear plastic sheet or a glass pane
- Small wooden dowels or sticks
- Thermometer
- Food-grade oven bag or a heat-safe pot with lid
Steps to build your DIY solar oven:
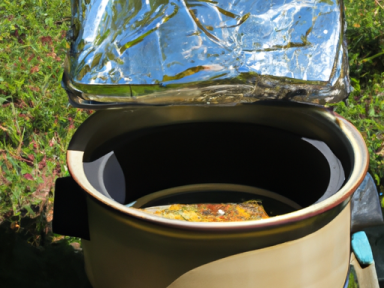
- Choose a cardboard box that is large enough to fit your cooking vessel. Ideally, the box should have a lid or closing flap.
- Cut off one side of the box, leaving three intact sides and the bottom.
- Cover the entire inside of the box with aluminum foil, shiny side out. This will help reflect the sunlight into the oven.
- Line the inside bottom of the box with black construction paper. The black color will absorb the sunlight and convert it into heat.
- Cut a square or rectangular opening on the top of the box, leaving a border of about 1 inch all around.
- Attach the clear plastic sheet or glass pane to the opening using glue or tape, creating a transparent window for sunlight to enter.
- Create a support for your cooking vessel by placing small wooden dowels or sticks across the top edges of the box opening.
- Place your food-grade oven bag or heat-safe pot with lid inside the box, resting it on the wooden dowels.
- Close the lid of the box and ensure it is secure.
- Position your solar oven in an area that receives ample sunlight throughout the day. Aim for direct sunlight for maximum efficiency.
- Monitor the temperature inside the oven using a thermometer placed inside the oven. Make sure the temperature stays within the safe range for cooking food.
- Allow the solar oven to preheat for 15-30 minutes before placing your food inside.
- Cook your food as you would in a traditional oven, adjusting cooking times as needed. Remember that cooking with a solar oven may require longer cooking times compared to conventional methods.
It is essential to practice caution when using a solar oven. Always use oven mitts or gloves when handling hot cookware, and be mindful of the hot surfaces of the oven. Avoid leaving the solar oven unattended and ensure that children are supervised when using it.
Building a DIY solar oven can provide you with a reliable cooking method that relies on renewable energy. It is a practical and environmentally friendly choice for any homesteader, survivalist, or individual seeking self-reliance. By harnessing the power of the sun, you can be prepared for emergencies, reduce your carbon footprint, and even save money in the long run. Take action today and start building your very own solar oven.

GIPHY App Key not set. Please check settings