
Fire-starting is an essential skill for anyone serious about their survival and self-reliance. In an emergency situation, being able to start a fire quickly and efficiently can mean the difference between life and death. One reliable tool to have in your arsenal is a ferro rod, also known as a firesteel.
A ferro rod is a simple yet powerful device that produces a shower of sparks when struck with a striker. These sparks can ignite tinder and set your fire ablaze, even in adverse conditions such as rain or strong wind. Unlike matches or lighters, a ferro rod is not affected by moisture and can withstand rough handling. Plus, it provides hundreds, if not thousands, of uses, making it a must-have for every survival kit.
While you can purchase a pre-made ferro rod from outdoor stores, crafting your own is not only a cost-effective option but also a rewarding experience. Here’s a step-by-step guide to creating your very own ferro rod:
Materials:
- A ferrocerium rod blank
- A handle material (wood, antler, or other durable material)
- Epoxy or other strong adhesive
- File or grinder
- Saw or knife
- Sandpaper (various grits)
- Drill with bits
Instructions:
- Start by selecting your ferrocerium rod blank. These blanks are readily available online and come in various sizes. Choose one that fits your needs, keeping in mind that a longer ferro rod will provide more sparks.
- Next, choose a handle material that feels comfortable in your hand and is durable enough to withstand rigorous use. Wood, antler, and micarta are popular choices. Cut the handle material to your desired length, ensuring it’s long enough to accommodate the ferro rod.
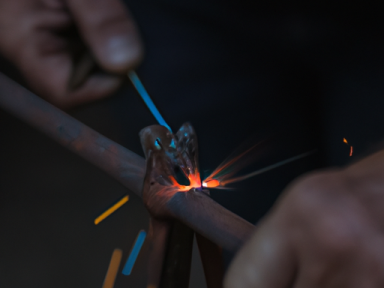
- Using a file or grinder, roughen the surface of the ferro rod on one side. This will create more friction and make it easier to produce sparks.
- On the same side of the ferro rod, create a notch near the top. This will serve as a notch for your striker to catch and produce sparks.
- Attach the ferro rod to the handle material using epoxy or another strong adhesive. Make sure it’s securely fastened and allow it to dry according to the adhesive’s instructions.
- Once the adhesive has dried, use sandpaper to shape and smooth the handle. Start with a rough grit and gradually work your way up to a finer grit for a polished finish.
- With a drill and the appropriate-sized bits, create a hole near the bottom of the handle. This hole will allow you to attach a lanyard, ensuring you never lose your ferro rod in the wilderness.
- Your homemade ferro rod is now complete! Test it out by striking the notched side with a striker or sharp edge. You should see a shower of sparks, ready to ignite your tinder.
Remember, practice makes perfect. Take the time to familiarize yourself with your new ferro rod before relying on it in a survival situation. Experiment with different tinder and striking techniques to find what works best for you.
By crafting your own ferro rod, you not only save money but also gain a valuable skill. In a world where we rely heavily on modern conveniences, it’s essential to cultivate self-reliance and be prepared for any situation. So why wait? Start crafting your ferro rod today and ensure you have the means to start a fire when it matters most.

GIPHY App Key not set. Please check settings