
Why Save Seeds?
Saving seeds from your garden is not just a way to ensure you have a continuous, free source of plants year after year. It also helps preserve the unique characteristics of your favorite plants, supports biodiversity, and can foster plants that are more resilient to your local climate and soil conditions. Here’s how you can do it effectively:
Understanding Seed Maturity
The first step in saving seeds is to recognize when seeds are mature and ready for harvesting. Seeds should only be collected from fully ripe fruits, flowers, or pods. Here’s a cheat sheet to help you:
- Tomatoes: Harvest seeds from the ripest, most flavorful fruit.
- Peppers: The seeds inside fully ripened, red (not green) peppers are best.
- Flowers: Collect seeds after the flower has completely dried out and turned brown.
- Beans and Peas: Wait for the pods to dry on the plant before harvesting seeds.
Cleaning and Drying Seeds
Proper cleaning and drying are crucial for seed viability and storage. Follow these steps for each type:
Wet Seeds (e.g., Tomatoes, Cucumbers)
- Scoop out seeds along with some of the pulp.
- Place the mixture in a container of water. Over time, good seeds will sink and bad seeds along with the pulp will float.
- Remove the floating material and spread the good seeds on a paper towel to dry thoroughly.
Dry Seeds (e.g., Beans, Lettuce)
- Remove the seeds from their pods or heads.
- Spread them out in a single layer on a dry, well-ventilated surface such as a screen or a paper towel. Ensure they are completely dry before storing.
Storage Techniques to Maximize Longevity
Seeds need to be stored in conditions that protect them from moisture, pests, and temperature fluctuations. Here’s how:
Containers
Choose Air-Tight Containers: Mason jars, vacuum-sealed bags, and special seed envelopes are ideal. If using envelopes, place them in an additional air-tight container to ensure moisture does not get in.
Labeling
Always label your seeds with the type and date of collection. Knowing the age of your seeds will help you prioritize which ones to plant first and ensure you’re using them while they’re still viable.
Storage Locations
- Cool, Dark Place: A basement or fridge works well. Aim for temperatures below 50°F (10°C).
- Stable Environment: Keep your seeds away from fluctuating temperatures and humidity. Consistency is key.
Testing Seed Viability
After some months or prior to planting, it’s smart to test the viability of your stored seeds:
- Place 10 seeds on a damp paper towel, fold it over the seeds, and put it inside a plastic bag.
- Check the seeds in a week or so. If at least 7 out of the 10 seeds have sprouted, your seeds are in good condition.
Saving and storing seeds is both an economical and rewarding way to sustain your garden year after year. With a bit of planning and attention to detail, you can keep your garden flourishing and preserve heirloom varieties for future generations.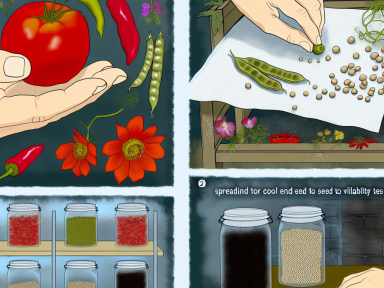
GIPHY App Key not set. Please check settings